Sunday, May 29, 2016

4Ground Buildings For The Chicago Way

I completed several 4ground buildings for my TCW table over the last few weeks, and am really pleased with the results.


My first build was the two story Corner Bakery from the World at War range. I felt with a few changes these buildings (they also do a one story Corner Grocery that I have two of that still need built) they could easily pass for buildings in prohibition era Chicago.


I have two each of these kits, so I decided to leave this first ones colors original, but I'm sure I'll change the other one. I did paint the interior walls a flat white (a decision I'm not sure I'm happy with) and did some striped wallpaper on the ground floor, which I am pleased with.


When I originally built this, I didn't realize that I should have taken that middle part on the top floor and swapped it for the middle part a floor below with the window; I'll be sure to catch that on the next kit. The reason for the switch is that that would now allow me create and place a side sign for the business, a window wouldn't allow that.


I had even debated on no side sign and leaving the building as a one story, but I like side signs way too much!


For this particular building, and being a corner shop as well, I was thinking for a business it probably should be something food related. Finding the 'Burbanks Ice Cream and Soda' sign fit this building perfectly! I found some small poster adverts for cakes, gum, candy, etc. that fit nicely on the windows and doors as well.


The look of this particular building, along with how perfectly the signs go with it, I think this may be my favorite so far!


I did the swap on the first and second floor middle pieces so I could create my side sign. Both parts popped right out with little effort and I had no problems making the switch. One down, three more corner buildings to go.


I really like old giant signs on the sides of buildings, and it's something you saw all the time in this era. So I threw a couple of really big wall advertisements on the row houses that run along the back end of the table. I cut each sign so we can still access the houses. Weathering needs done on the buildings though, the signs stick out a bit too much in my opinion.


Next up was 'Oldfield Tire Shop' from the new TCW line. This was a really easy build, and went together quickly. There were a few mis-labled parts but nothing that I didn't catch right away.


I debated on whether or not to leave the front overhang, as I felt I could fill in the holes for it and still have a nice storefront (I bought two of this kit, so I think for the second one I'll leave the overhang off).  


I decided to leave it, but I printed out what looked like a canvas type material to give it an improved look. And as usual, I changed the sign :) This time I found a cool looking sign for Clapp Radio & Electric. Seemed like a pretty appropriate business for the time period.


What I have to get though, is a boatload of the 4Ground sidewalks! Unfortunately though the sidewalk package does not come with pieces that will work with corner shops, like the bakery and grocery, so I'll probably end up having to cut those. I'm sure a future release will fix this.


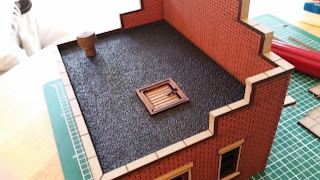
The biggest problem with this particular kit is that there was absolutely no way to get the roof off easily to access the inside of the building; unless you flipped the little hatch open and used that as a "handle" to lift if off. It was a bit of a head scratcher as to how this didn't get caught by the 4Ground guys.


My solution was to use some of the leftover roof details from The Wrigley's Building and use that as a "handle" to get the roof off. A vent in the corner worked perfectly for this.


I also decided to improve the look of the roof by creating a shingle type of surface. Some sandpaper cut to size, painted black, and then glued on did the job.


Next up was 'Davis Jewelers', again from the new TCW line. When these buildings were announced I was immediately drawn to the storefronts - I really liked how 4Ground changed the doors and windows for these new buildings.


This particular buildings front really reminded me of Geiger's bookstore from my favorite movie of all time, 'The Big Sleep', so I ended up buying two of these kits.


The building itself went together in absolutely no time at all, and the brick columns on the sides is a really neat detail (I still need to do touch up work and get the Geiger Bookstore sign made).


The big issue ended up being with the front windows - of course my favorite part! The frames for the windows, and also the door frame as well, are so thin and fragile, it makes it extremely difficult to work with and to get the windows placed nice and straight. I really think that this is a time when plastic parts would make this part of the build easy peasy. 


I've tried a few different methods to get the windows in on different kits now, and still haven't found one that works perfectly. Hopefully I can find a solution, because despite all the issues, I still really love the look of these new storefronts. I unfortunately was missing the piece that would have filled that gap in along the middle of the roof; not a huge issue as I'm sure that I'm going to change the roof.

A few more buildings are almost complete, and we've got a little AAR coming from a game played a couple of days ago!

As always, thanks for looking!
Ivor

Friday, May 27, 2016

The Chicago Way Police & First Game

Work on the farm has been absolutely crazy busy; everyday 10+ hours, so it's been hard to keep chipping away at the long "to do" list for The Chicago Way. I wish this game came out in February when all the horses were down south and I basically had a 10 week vacation (though I did get quite a bit of my Bolt Action backlog finished)!  Anyway, a busy couple of days saw me complete my first gang for TCW. I decided to paint up the police first, as I felt that they would be the easiest to finish quickly.


I started as usual with painting the skin tones first and then did the main blue color, which was Vallejo Intense Blue. As you can see that blue wasn't anywhere close to the color I wanted (the photo below on the figures to the right).


To darken up the blue I used Army Painter Ink Quickshade Dark Tone. It took 4 coats of the ink to get the blue to a shade I was happy with!!


Here is a quick photo of 4 of the officers with their shading completed with the other 3 without - you can see what a huge color difference there is without the shading.


And the full gang completed. Clear bases were still in the mail at that point.


Jakob and I played a quick game (almost 3 weeks ago now) of TCW and only used the figures, no vehicles, just to get a feel of the rules since it had been forever since we played a game of DMH. Jakob played the gangsters and I took the police. The scenario was a liquor raid at the Wrigley's building.  Here are a few photos of the board I quickly set up for it.


Some Dead Man's Hand buildings made their way onto the board to fill in space. I think that the bank could actually work in this setting if I took it off its mdf base and changed a few other things.

We used the photographer as part of the special civilian rules. If you control this figure he will be a part of your gang and you can move him around the table to take "photographs" - adding a re-roll bonus to any of your figures within 12 inches of him.


The interesting twist to civilians is as the "bad" guys gang, if you kill a civilian you add one card to your hand.


I won control of the photographer, and he ended up with the highest activation card, so he got to move first. I did a "move, move" and put him into what I felt was a good position outside the Wrigley's building near the truck.
Jakob was next to activate, and what does he do with his first activation? Moves one of his figures just inside the building into a position to try to shoot the photographer. What does he do with his first shot? Rolls a 20 for an instant kill; adding another card to his hand. Honestly, kids these days. So yeah, I really got to enjoy the new civilian rules; by moving him a total of 12 inches. That last sentence was written in my sarcasm font :)


A lot of the action turned out to be a fire fight outside the entrance to the Wrigley's building - with me rolling as I normally do when I play games, horribly, and Jakob the complete opposite, ridiculously good.


We did have a pretty brutal hand to hand fight between the officer next to the yellow car and the gangster in the gray coat, which was good cinematic fun.


As usual Jakob ended up winning the game, but it was fun to give TCW its first go. Next time we'll get some vehicles into the game.


When my clear bases arrived, I immediately began to prep the police officers for them. I decided to try pinning the figures into the bases as opposed to gluing them; the glue always ends up leaving a "frosted" look around the feet of the figures, no matter how careful you are.


I used florists wire for my pins. The little hand drill was perfect for both the figures and the base. 
I was able to pick up 50 Litko clear bases for $15.00 off of Ebay, so a pretty good deal I thought.

Cutting the bottom off of the figures was pretty easy with the cutters and Xacto knife.


I drilled holes out in the feet and the pins went in really easily. Then it was just a matter of cutting them down to size.


I used the pins in the bottom of the figure to make my marks for the drill holes in the bases - positioning the figure where I wanted it and then pressing down a bit. This left little marks in the base giving me the spot for the hole. Pretty easy.


The biggest lesson learned was that I should do the basing before painting the figures. I had to do some touch ups to several of the figures where I was holding them (hats was a big one), and then all the shoes needed repainted from the cutting of the Xacto knife.


The final results worked out brilliantly! Everything was solid in the connection between the figures and base, nothing loose, and of course absolutely no "frosted" look because of the glue.

Next up are some new buildings for the board!

As always, thanks for looking!
Ivor