Friday, March 31, 2017

Hydra Research Facility #13 - A WIP

So I'm just a few hours away from everyone returning home so I thought I'd try to get one more update in on what will ultimately be called Hydra Research Facility #13. For my first attempt I played around with some different tile configurations and settled on this floor plan for what will end up being the main console and control platform/room. .


I was even playing around with some old leftover O scale fencing that I cut to possibly work as a railing to go around the platform. Not quite sure if it's going to work out for the way I want it to look though.


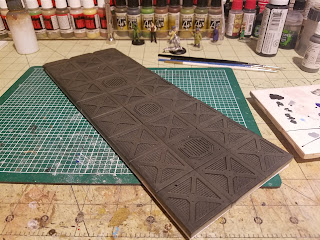
I got everything together pretty easily, though in hindsight I probably should have cut this section of tiles in half. I had a bit of warping occur after the glue set, which is super annoying. A quick wash, dry brushing the pipes and the grate plates and it looked pretty good.


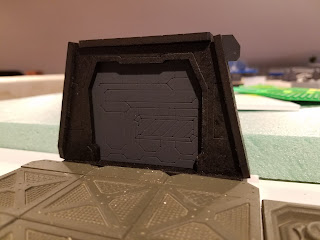
The first mock up of the hallway that leads to the secret elevator from the house - which will be located behind the door. The door is one of the new Spartan Games doors I mentioned in the last post.


The mdf for the frame didn't take very well to the first black paint I tried, just regular Krylon primer spray paint, as you can kind of see in the photos below. I have to say, now that these are built I'm pretty impressed with them - initially I was pretty disappointed they weren't resin like all the other Spartan Games accessories but these are going to work really well!


I used Plastic Soldier Company spray on the door and it really took to the mdf and looks fantastic. I ended up going back over the black with Army Painter black paint and that too worked a treat - the last photo in this series, I forgot to take a close up of the re-paint. So just from this small test, miniature specific spray paint worked way better than "regular" spray paint for me, so I'll be continuing this practice going forward.


And a quick wash applied to the first hallway tiles.


Still need to do the dry brush and some highlights, but really happy with it even in it's current state. The door pictured here has the AP black paint applied.


Some really great news is that the tiles are actually bigger than one inch! They are well over an inch and a half, so that means my initial count of 1296 floor tiles that I need to cast will be greatly reduced! I think watching all the videos on You Tube and people talking about building their tiles into sections like 3x3, etc. put that thought in my head. I thought they meant 3 inches by 3 inches, but it was just the number of tiles used not any type of measurement - thankfully I was wrong!!

Moving inside, there is a perfect little nook on the first floor in the building complex for the above mentioned elevator. It is going to be located behind a secret bookcase wall, which will hide said elevator!


I used Evergreen styrene to make the elevator. That new paper cutter made quick work of the cuts and most importantly they were all straight!


This was the first time I'd really used styrene glue and it worked brilliantly! So glad I didn't try my standard super glue to attempt to put this together.


In place with the to be built book case in front.


I used scrap pieces of mdf from old 4Ground kits to make some hand rails and other trim in the elevator. Just need some paint.


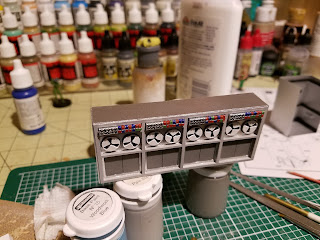
I showed the end result of one of the Crooked Dice computer banks I built in the last post as well, but here is the WIP with the additions I made to improve the look.


Super easy and fast to put together. There aren't even any directions, they are that easy to put together.


I added some styrene to some places that you could see the joints between the pieces of mdf and I think it makes a huge improvement.


I also added styrene around the outside of the computer banks to cover up joints there as well.


I've improved the process quite a bit by painting the mdf before assembling, but of course didn't take any photos of those two.


Finished up these really neat cardboard boxes from 4ground too.


I do have to admit, this whole making multiples of the same item thing is getting annoying pretty quick though! Repeat 29 times...


Well I did and it's pretty amazing how good they look. I've already found some neat labels while searching online that I'll stick on the sides and tops soon.


So lots of WIPs, but moving in the right direction.

I did make a bit of a mistake by not realizing I'm going to need Hydra soldiers for the Carter gang to go up against. I've got nothing available currently. I have a bunch of WWII Germans but obviously don't think that they'll work if I put the setting in the US - plus they are based in the traditional way, it'll look a bit silly with figures having grass and flowers on their bases in an underground facility. So that's a new hurdle.

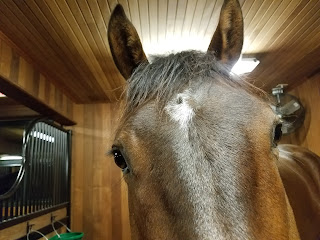
As I mentioned, I was trying to get this up before everyone arrived home, unfortunately that didn't happen. Wife and horses are all home safe and sound now - no one would cooperate for a picture, but this one of Skyfall was pretty funny!


As always, thanks for looking!
Ivor

Sunday, March 26, 2017

Fun With Hirst Arts Molds

I started straight away on trying my hand at casting some of those Hirst Arts molds I purchased last week. Thursday evening saw me cast about 30 or so molds, I lost track after I started to get the hang of it and quickly added more molds to cast at one time.


Admittedly I made an absolute meal of the very first two I did. I started slow and only cast two of the floor tile molds first - I knew that those were the molds I would have to make the most of, though at the time didn't realize exactly how many I'd ultimately need (see below!). Before I'd started, over the last week or so, I'd been watching all sorts of videos on You Tube on how to cast these molds. And each one was different to the techniques they used. Obviously I went to Bob Hirst's videos first, but I also went to a lot of the channels I've followed over the years - Viv at RubbishinRubbishout, Mel at the Terrain Tutor, Mike at TerranScapes, and then just other random Hirst molds videos (these tiles are pretty popular with the D&D crowds!). Anyway, my goof with those first two molds was I ended up waiting too long to do my initial scrape of the excess plaster, which made it necessary to sand them down. They were fine after sanding them, but you can see the problem in the photo below.


With the first goof up under my belt, I did quckly learn to do that scrape of excess plaster right after pouring it into the mold, as well as to simply look at my mixing cup to know when the molds were dry and ready to be popped out. Squeezing the cup and having the plaster crack let me know if it they were ready to go. Easy peasy.


I quickly got the hang of everything and soon made it up to doing 9 molds at once, even though the picture below is eight :)


And this was the end result of two days worth of casting - though all told probably about 8 hours or so of work, but almost 10 pounds of plaster.


Super pleased with the overall casts. I do have some with pin head sized holes in them from bubbles, but overall for my first go, I'm pretty happy. And I figure I can fill in those holes with no problems.


I knew I wanted some cool looking doors for the facility, and I've been nothing short of ecstatic with every Spartan Games purchase I've made so far, so I grabbed these doors off of Ebay.


But to much disappointment, when I opened the box the doors were MDF. I really thought that they were going to be resin like all the other Spartan accessories I've purchased. So I guess we'll see how they end up turning out.


I really wanted to start putting the pieces on the table Friday night just to get an idea of how things were going to look. What struck me right away when I grabbed a few pieces was how cold they were to the touch - turns out they weren't completely dry yet!  And that really became apparent when I placed them on the cardboard and almost immediately it began to warp - so I had to wait an extra day to make sure everything was completely dry. Kind of a bummer really.


So it's a day later and I very quickly threw a primer coat of paint on several floor tiles. I went with a greenish gray - Plastic Soldier Company's German Field Gray - as opposed to a straight gray. But again, this was just a quick initial spray.


Straight away I really liked how the floors looked without doing much to them. I will tell you though, when I looked at how many tiles it took just to place into these two small areas, and then looked at the rest of the board, I did let out a big sigh. I'm figuring that the facility floor gaming area will probably be roughly about 3x3 - now each tile is 1 inch, so that means I'm going to need approximately 1296 tiles. Twelve. Hundred. Ninety. Six. Shoot me right in the face right now lol!!!


I ended up painting the inner tiles for the computer room a dark gray - again though, just a quick priming spray. But I do like the contrast, even without a wash or dry brushing.


A close up of the computer room floor.


One thing that did concern me was the height of the walls. They just didn't seem high enough.


So what I'm going to do is run these Evergreen styrene tubes under the walls to give them the added height I think they need. I have a ton of these left over from a race track I built Jakob when he was little, so it'll be nice to finally find a use for them. I may even need to go one more higher, so three total, but we'll see.


As I mentioned in my last post I had Agent Carter seasons 1 and 2 on my DVR, but lost them when it broke last summer. I did buy the blu-rays and have actually watched season 1 several times now. Well, I went to start season 2 a few days ago and it turns out I got bamboozled by different covers. I have two season ones! Ultimately my own fault for not looking more closely at the title, but extremely disappointing - so a real season 2 is on its way.


One last thing I'm working on is the description of the game for the Historicon PEL - I need to come up with a title for the game and I'm not sure what to go with. I thought about "My Name Is Agent" because it's such a great moment in that second episode where the head of Roxxon says "What's your name darling?" and Peggy responds with "Agent". It's absolutely brilliant but out of context I'm not sure it works. I may end up just going with the generic "Agent Carter" for a title. If anyone has a suggestion I'd be all ears!

Just about a week away from everyone returning home from the trip down south, so I'm going to try to get as much casting done as I can. Twelve. Hundred. Ninety. Six. Tiles.

As always, thanks for looking!
Ivor 


Wednesday, March 22, 2017

Historicon 2017

Ok, I think I've finally gotten my head on somewhat straight enough to finally make a decision about Historicon 2017. I'm going to take Agent Peggy Carter and members of the SSR down to Fredericksburg in July to stop the evil forces of HYDRA from using stolen Stark technology to try to rule the world. No pressure, right?!


This keeps me right in the wheelhouse of my favorite time period in history - I absolutely love the 30's and 40's! All my favorite movies are from this era, as are all my favorite actors. I think I'm going to make the narrative occur stateside as this will also allow me to use all my pulp era figures. This will give both the figures and board that retro look I'm after too. We'll see I guess - there are a lot of ways to go with this.


I was a bit late to the Agent Carter TV show, as I usually am with these things, though I did have both seasons recorded on my DVR - which of course I lost when my DVR broke last summer without watching a single episode! Anyway, Blu-rays of season 1 and 2 have since been purchased and I've been pretty much obsessed since watching that first episode.


What this now will do unfortunately is put my Jonny Quest campaign on hiatus for about 6 months; because as of now, until the end of July, I will be focused on pretty much nothing but Agent Carter and HYDRA.


As well as learning the rules to Crooked Dice's 7TV. I think this is going to be the perfect rules set for this type of game, and I'm almost ready just to give a quick playtest of the rules once I find a friend - just kidding :) I'll make my son be the guinea pig. Besides, he's got to help me with this at Historicon anyway; I'm paying for his admission, hotel, and food - he owes me!


I've already been brainstorming and working on a general 'must have' list for the board. I was going to do a James Bond spy-fi game initially so I bought the 'World of James Bond' book that has some fantastic cut-away drawings of the different villains lairs a few weeks ago to get some inspiration for the board - and in usual Ivor fashion changed my mind to Agent Carter :) But I think a Bond game will definitely be in the future at some point; this board is going to easily be able to be used that type of game.


I'm a huge sucker for these kinds of cut-away books because I love to see how things work together. I have several Star Wars, as well as an Indiana Jones book like this one that are just fantastic.


This book only cost me $4.00 total off of Amazon, $3.99 is what the shipping was! It was easy to get some initial ideas for the board with just one quick flip through the book. Once I got the magnifying glass out though, that's when the ideas really started flowing!


I've already started to muck about with some possible layout ideas for the board. I'm definitely going to use my 4Ground hotel complex as the "front" for the underground research facility. This part of the table with all the buildings will be raised about 5 inches above the underground facility to show that it is above the complex, hiding the evil that is below.


I found a bunch of boxes of Jakob's old Lego's (which I now know how we're going to pay for college in the fall - there has to be about a million dollars worth of Lego's in all the boxes) and figured I'd use those to play around with to get some different ideas for room placement - this will allow me to move, gauge different heights of areas, and switch stuff around much easier than on the sketch pad.


Some must haves for the research facility - there will be the main control/computer area (gray), an area with some cloning tanks (green), an office area (blue), the computer bank room, a minions room, a catwalk around the perimeter, an elevator from the main house down to the facility, an elevator for equipment in the carriage house, a secret tunnel from the well into the facility, and then generators placed in the middle of the entire complex. I'm even kicking around the idea of a dock for a boat or maybe a submarine. Hopefully I can come up with more ideas as I actually move and place things around on the board.


Story wise I'm not sure yet if I'm going to do an alternate timeline or what, but I think Red Skull has to be in the game. This is a Heroclix I grabbed off of Ebay. A bit taller than the rest of my 28mm figures, but I think it will work out with no real problems.


I also bought an obscene amount of these data and computer banks from Cooked Dice. I'm not even going to tell you how many I have to build lol!


The bulk of the research facility is going to be built with Hirst Arts sci-fi molds. I got an absolutely incredible deal on 12 molds off of Ebay, paying just over half of retail on them and not even having to pay for shipping. Honestly, I feel pretty dirty about it - I could easily resell them all right now and make a big profit.


Merlin's Magic plaster is on it's way and I'm super excited to give this casting thing a go again - I'd done some rock casting for a train I built Jakob when he was small, as well as using those same molds to make islands for the old Wiz Kids Pirates of the Spanish Main tabletop game we used to play when he was little too, but it has been years since I've done it.


I also used a 50% off coupon to buy this paper cutter from Michael's. Another super sweet money saving deal - I've already started to use it on cutting styrene for that elevator in the main house that will descend down to the underground level. This is going to give me perfectly straight cuts as well as making it much faster to build something.


Lots still to do in the next week - I've got until the end of the month to register for the PEL for Historicon and I was even debating on doing another game - sort of a prequel to this game. Basically it would be the beginning of Captain America where Schmidt stole the Tesseract from that church, but instead stealing the Stark technology. I have everything already built to play that kind of scenario; the 4Ground church, German bad guys, resistance fighters, plus all sorts of other damaged buildings that could work. It would be neat to run a continuing story game over the course of the convention, but I have a pretty small car so I better just focus on my initial idea!

As always, thanks for looking!
Ivor