Sunday, September 30, 2018

Breaking Ground On The Twin Peaks Mall From 4Ground


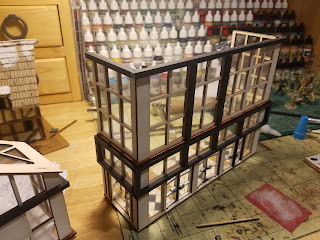
As I mentioned in the last post, I've been wanting to build something, anything, for quite a while now. So why not try something easy like the entrance to the 4Ground Twin Peaks Mall? Excuse the paper sign for now, a 3D printed sign is going to be an absolute must in the future.


For probably the last year and a half I have slowly been picking up kits from the Twin Peaks line. Taking full advantage of sales and discounts because they are definitely on the expensive side. All told I can safely say that everything that I've bought (which is the monster starter box in front, and then the two stacks immediately behind it) so far was at 40 to 50% off. Yeah, I know, madness lol!


I actually have a total of three entrances. Again, yeah, I know! But if you're building a mall, go big or go home I say - and why I have those two huge stacks of kits. Thinking that the entrance would be really simple was pretty dumb - mostly because I never make anything simple as you'll see below.


I'm not sure why the doors weren't painted in a metal color, so I did that myself.


I love 4Ground, but a few things that really bother me about their kits is the "flatness" of the buildings and a lot of the "sameyness".


While the kits to create this entrance definitely didn't suffer from any "sameyness", I did feel it definitely suffered from that "flatness" I mentioned.


I decided to use some old Evergreen strip styrene I had in a box to try to make the entrance frame not seem so flat. These were square tubes, measuring at 3/16" or 4.8mm. In hindsight I wish they weren't tubes because I had to fill in those holes, but it was what I had on hand. I won't use them on the next build.


I definitely think that something like this was needed, I only wonder if I should have used a smaller size. I'm thinking yes. And that I also need to add a few more pieces to the corners and ends.


What's nice is that for a post apocalypse setting, a lot of the burn marks on the parts that I usually have to clean up from the laser can be left to give a more distressed look. The above shows an example of a cleaned up piece (right side) compared to the untouched piece (left side). A huge difference.

I also put together one of the expansion roof and floor kits. The "glass" on all these kits is a real challenge - even being incredibly careful you're sure to get a few finger prints on them and it's super annoying for someone who has OCD!


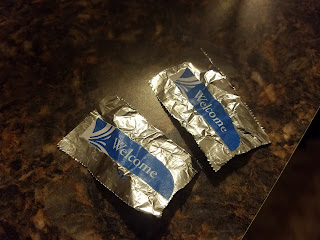
I added some "Welcome" signs to either side of the front doors. I found the signs online and resized them to fit in the space. I also glued them onto tin foil to give the an improved look.


A simple addition, but I think it makes a big improvement to the entrance.


Looking from the inside of the entrance.


I thought it would be fun to have product banners hanging from the rafters. Being a zombie apocalypse I figured that a skin care product sign would be hilarious. Searching online I found the perfect one and by using this cream, you too can look 10 years younger in just four weeks!


I added some thread to act as the wire to hold the sign. I think having a lot of different rafter signs will add a lot of fun tongue in cheek laughs to the layout.


I also put together a couple of the 4Ground planters and added two ferns. I'm really impressed with how good these look. I still need to add some rocks or dirt to the inside of the planters, but just plopping the ferns in them really makes them pop.


One rabbit hole I did go down was actually painting the tiles on the floor. I think it's a night and day difference and I'm really happy with the end result, but oh my word!


It took a really long time and the thought of doing this throughout the entire mall has me reaching for the nearest sharp knife lol! Here is a normal floor tile.


And here are a few figures in the new entrance - and it shows why I'm all about this new thin clear base, the figures just blend right into the floor. I'm going to wait to do any kind of weathering because I'm not sure if I'm going to make this early days of the apocalypse or much later into it.

So a fun little start, but I don't see the mall being any kind of a focus. There are way too many things I need to sort out design and layout-wise. The biggest being the roof. I'll be totally honest here, I think 4ground really missed a huge opportunity here. The roof could have essentially been a whole other level for game play, but instead you've got a pitched roof. It's a real head scratcher for me. That absolutely has to change, and I'm not sure if I can do it. I totally redesigned the roof to 4Grounds warehouse kit here, but this is totally different. There are other issues too - all the stores are essentially "shoe boxes", where are my corner shops? Why there isn't a hallways expansion set has me shaking my head as well. And where is the movie plex??!! Oh well :)

Moving into October I've got some more Walking Dead figures lined up to finish.

Also a quick shout out to a couple of new followers - Stewart, Gerardo, Staz Matt - and I don't think I ever acknowledged Jason F, Millsy and Joe - thanks a lot for following guys, I really appreciate it!

Until next time, thanks for looking!

Ivor

Saturday, September 22, 2018

D-Day Conneaut 2018


There are two things that I get to look forward to each year; one is Historicon, which I missed for the first time in six years (to which I am still incredibly bitter about, lol!), and the other is the D-Day reenactment in Conneaut, Ohio.


If you've followed the blog for a while you'll have seen posts on this event before. This is my sixth year participating in the event and my seventh overall.


Over 1500 reenactors come from all over the country, and overseas as well - we had several guys come over from England this year - to participate in this reenactment of June 6th, 1944. Estimates for visitors to the event over the course of the three days is somewhere around 30,000.


And each year, just like a broken record, I always say it keeps getting bigger and better. Of course, this year didn't fail to impress.


They have a fully functional spotlight that looks absolutely amazing in the darkness of night.


The 88 continues to be the one demonstration I look forward to seeing every single year.


I've said it before, but when this thing goes off you can literally feel the blast, even being hundreds of yards away.


What an absolutely amazing photo this is!


Embarkation.


Lots more demonstrations and events occurred on the beach this year, with amour being a focus.


These almost look like production stills from a film.


I can always count on someone to capture some amazing photos of the planes making their runs along the beach, and these are some of my favorites.


Using grayscale for the photos really makes them look like they were taken in 1944.


The French resistance have their own battle reenactment now.


I'd been wanting to ride in the sidecar of one of the motorcycles for years now and finally this year got lucky enough to catch a ride in one while heading back to the reenactor parking lot.


This was the motorcycle I got to ride in, and it was brilliant! Though admittedly a bit odd looking with me in my Airborne uniform :)


I'd also never been able to ride in a jeep in all the years I've been doing this event - well check that one off the list too! I was lugging the box of football uniforms and a good 'ol Willey's jeep stopped and got me to the parade ground. Maybe it was my uniform, but let me tell you, I had a time throwing my leg up and over to get in the jeep lol! The only thing left now is to get inside a tank :)


We also had our annual Allies V Axis football match. This year I was asked to captain the Allied squad and get the entire match organized. Unfortunately a period accurate match ball isn't available so I tried to find something that would only look marginally out of place.


I used the opportunity to spend way too much of my own money to get our uniforms to match up just like the movie "Victory" or "Escape To Victory" as it's known in Europe.


The blue socks were a cinch to find, but who knew finding plain white shorts could be such an incredible hassle?

It was literally two days before the event that the shorts finally arrived, so a happy ending and for the first time ever I think we really looked the part - and thankfully continued our winning streak. We'd gone down 1-3 midway through the first half and my heart just sunk because if we'd have lost, it would have been on my watch, and we have yet to lose this match since it began.


I take absolutely horrible photos, unless I don't know the photo is being taken. Which is why these are actually ok and I don't look like a goof, though that bald spot is just awful :)


With all that being said, the photo above is really what this event is all about. Pictured is Al Klugiewicz, a 102 year old vet of the Signal Corp. This is Al in the Message Center, right in front of the telegraph typing out code and not missing a beat. Absolutely one of the most amazing things I've seen since coming to this event!

I've built a couple of small 4Gound kits that should be next up in the blog. As well as a little tutorial on how I make my new and improved clear bases.

As always, thanks for looking!
Ivor