Showing posts with label 4Ground. Show all posts

Tuesday, July 20, 2021

4Ground Sheriff's Office Revisited


Apologies to everyone for the silence the last couple of months, I have been having major issues with my laptop and finally thought that I had it sorted a while ago but unfortunately did not - a new one looks like the realistic solution but the bank account says differently so we'll attempt to plug away using the mobile device 🤷‍♂️


I saw Dave Stone was having another hobby challenge with scenery so I decided to jump in and revisit some old 4Ground buildings of mine.


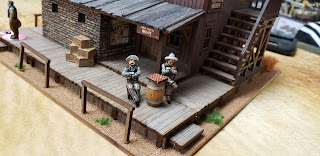
First up, I went back and re-worked the entire 4Ground Sheriff's Office.


As you can see, it really changed quite a bit from what comes straight out of the box.


I think that's what I love most about the 4Ground stuff, is that you've got a great kit to start but have that ability to enhance it if you want.


To be honest I'm not completely happy with the colour of the walls, so I'm sure that will be another re-visit in the future.


The roof and the overhang though I couldn't be happier with. I cut some old bass wood and stained them with some inks and I think I'll be trying this out on a couple other buildings as well.


Knuckleduster have a really neat office set for your town sheriff so I painted that up to add a bit of fun to the interiors.


I've talked about this before, as we really begin to edge towards making a "dollhouse" with these types of additions, but for me I'm all about the little details and that's really what I think brings a table/game to life.


Here was my prisoner, axiously awaiting his breakout.


I added a lot of little details to the table, with newspapers, wanted posters and some coffee mugs.


If there was a miss I would say it's definitely the walls. I added a few pictures to break up the monotony but changing the brightness with a wash would have improved the look - though that is much more difficult with a model that has been built probably 8 years ago or so.


The sheriff with the jail key objective marker. The Knuckleduster set comes with this key so I threw it on a clear base so it can used in game and easily moved around as an objective.


This might be my favorite photo of the lot, a couple of deputies looking over the town after a game of checkers.

Until next time, thanks for looking!
Ivor

Saturday, February 13, 2021

Paint What You've Got Update


Despite the brick wall I've hit regarding my original plan of completing the MV Australis I have been doing quite a lot on other projects and getting them completed, which I couldn't be more pleased with.


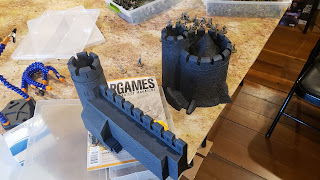
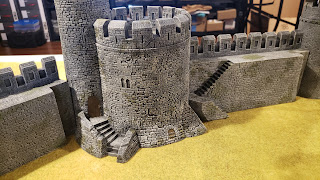
The biggest project that I've completed was this Hudson and Allen castle - 12 full pieces. I picked up several job lots on Ebay last year while I was in South Carolina and they have sat unpainted since.


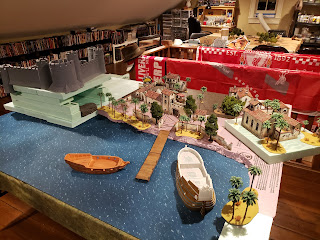
My original plan was to build something ala the first Pirates of the Caribbean movie where the fort was perched atop a cliff for Historicon last year, which of course never happened.


I was playing around with quite a big idea as you can see by these early idea photos. Always the visual presentation first and foremost at Back to the Tabletop.


I wanted different heights for the walls to give it some variety visually, and this will definitely be something I will do with the castle in whatever capacity it is used in the future.


Anyway, back to what was actually completed and not pipe dreams lol. Here's how the all the castle pieces come, with an initial light gray prime.


I put a black prime put on all the pieces.


Then a dark gray drybrush, and light concrete colour drybrush.


Details with some washes to create moss like effects. 


Though I do think I'll actually put a bit of flock or maybe ivy in some places just to enhance that look a bit more.


Those with a keen eye will notice that I still need to track down a gate to complete the overall set, doh! But regardless I have always wanted to have a castle ever since the Dungeons & Dragons days of my youth and now I do.


I've also been blasting through a lot of 4Ground kits.


When I won that contest from 4Ground a few months ago I used the gift certificate I received to pick up several 15mm kits.


The idea was for a possible tank game in the future as I have lots of 15mm Flames of War tanks sitting that I think would be fun to try to get on the table with maybe What a Tanker by Too Fat Lardies. 


This was a really neat farm complex. 


Why this was never done in 28mm is honestly a real head scratcher to me.


I've built so much 28mm stuff that building the 15mm kits went incredibly fast.


There isn't nearly as much detail on interiors, windows, and doors so I'm not quite sure what I will do to add and enhance the look of these buildings like I do with all the 28mm ones. Roof shingles and tiles are definitely something I need to sort out.


And none of the doors open and close so you have to make a decision on which you want and glue away.


I also built up this stagecoach.  


But decided that I didn't want it to be red so out came the black paint. I think it looks much better black.


I also finished this prison wagon.  This was going to originally be used in the Zorro scenario I made up a few weeks ago. 


The last thing I built was this neat white barn.


Jeff and I got a bit of the ACW bug and wanted to give Sharp Practice a go so I thought this would be a perfect addition to the table.


I really like the roofing material 4Ground have used here, but I'm not sure I'm sold on the weathered effect from the laser "burn" on the outer walls. I think that this is something that will be addressed in the future.


A really nice and big hay loft inside.


I think I will go in and do some detail work on the interior of the barn in the future as well, but she's good to go to hit the table now which is always the goal.


And the last thing I've been plowing through is re-doing all of my tree plates. Something that always bothers me is how when you use store bought trees is that they are all the same height.


So I went back and added some wood dowels randomly to the trunks of the trees to make them a bit taller and I really think it improves the look.


The other thing I did to make the plates easier to play with on the table was to add magnets to each tree.


And of course on the actual plate. When models move into cover in the trees this will make that much easier to manage.


Lots of bits and bobs finished to 100% so a big win for me overall.

Until next time, when the results of that ACW bug mentioned above actually made it to the tabletop for a game of Sharp Practice, thanks for looking!

Ivor

Wednesday, November 18, 2020

4Ground Samuel's Garage


A year is an incredibly long time, and that was the last time I actually posted an update to the blog. So first and foremost, I hope that you and your families are all safe and well in these absolutely crazy times - what a year.
 

To say it has been difficult to actually turn the computer on and update the blog (I've actually had several posts in draft mode, and even one since back in January) would be an understatement, so thank you all for sticking with me during that long down time. I'm not sure if I want to go into any real detail on the goings on of the past year as we've all had our own struggles to work through, but the most important thing for me right now is I'm hobbying again - and actually quite a lot! If I can stay motivated to keep the blog updated a couple of times a month, I easily have plenty to post about for months and months ahead from the work I've been doing (I've been hitting Star Wars and Lord of the Rings pretty hard, as well as quite a lot of terrain) since August. Now if only I can get a better camera - apologies for all the awful phone photos.


So we'll start with a kit I went back and revisited a few months ago, Samuel's Garage from 4Ground.


This is one of my favorites from the guys at 4Ground and I'm really glad that I decided to go back and do a bunch of improvements on my initial build.


Just from a quick look you can see I completely re-worked the entire kit. From layout, to details, and most importantly weathering.


One of the first things I decided to do was to weather the entire building, inside and out. As the signs are a real focal point of the model I really made it a point to weather them in a realistic way with a heavy rusted look.


It was actually a lot of fun and makes the model really have a lived in feel to it now.


I also painted the wood along the bottom of the building in a green to match the Sinclair signs to give it a little more of a uniform look. A simple addition that really improves the overall look of the model I think.

.
I added a lot of new details around the front garage doors. The doors are probably my favorite feature on the entire building and one of the main reasons for reconfiguring the aluminum overhang over to the left side was so that the doors could now be seen. With the overhang positioned where it originally is supposed to be you'd never see the doors unless you were at eye level with them, which honestly probably would never happen on the tabletop.


By moving the overhang I've opened up the entire front of the building and also created a really neat covered feature on the left side of the building.


It's funny how such a simple change improves the entire model - along with all the weathering and additional signs around the building.


All of the little detail pieces are both O scale train accessories as well as some 28mm boxes, fences and crates from 4Ground.


I decided to go all out and really put a ton of detail pieces into the inside of the garage, for no other reason but "why not?".  And truth be told, I went overboard lol!


All the work benches, shelves and stacks of tires are all O scale resin model railroad accessories from Rusty Rails


There were a ton of details to paint on these but it was fun and adds so much to the overall chaotic feel of the garage.


I threw the Mantic truck from TWD game with a ton of 4Ground cardboard boxes (with little custom made shipping labels on them) into the bed in the garage. One thing I completely forgot to do, and was a total head slap moment when I was editing this post was to dirty up that floor - how the heck did I miss that?!


I also weathered the inside walls as well as added some studs to give the walls a little more detail.


A giant Coca-Cola sign on both the front and back walls completed the interior.

If you're still here, again much thanks! And also a big thanks to all of you whose blogs I follow for giving me something to read and look forward to during my absence. It helped in ways that can't be measured.

Finally, a quick shout out to new follower Planet Mut, really appreciate you hitting the 'follow' button - hopefully the next month or so will make that follow it worth it 😀

As always, thanks for looking!

Cheers,
Ivor