Monday, February 23, 2015

Fords Canyon First National Bank

I want to start by saying - and if you've read any of my posts from the past, you know it's clear - that I absolutely love the 4Ground range of buildings. From Black Powder, to The Old West, Baker Street, to World at War, and everything in between. The number of kits that I have completed is pretty staggering, and I still have a pile of World at War kits to build! The quality is top notch and as far as customer service, the guys have always taken care of any issue or missing piece that may have arisen - and I live way across the pond, a damn Yank as it were! That being said, I have to say the Bank was probably my least favorite build I have completed, and I know that was the reason it took me so long to complete it - two different sessions with probably a six month break in between.

Again, I don't want this post to turn into "Why I hate the 4Ground Bank", so I'll just say a couple of things on why I think I felt this way. When the Bank was first announced I was pretty excited - a Bank has so many cool possibilities scenario-wise and it's such an essential part to any Old West story or town. Two things struck me right away when the photos were finally released - first, it was a square. And I don't mean kind of close to being square, it's exactly 8"x8" (20cm x 20cm for my mates across the pond) !? And second, it was wood. I guess I already had a preconceived notion in my head of a stone/brick building (probably from the Leone film, For A Few Dollars More) and something similar design wise to the Condon Bank from the famous James Gang raid. Maybe the baby blue color bothered me a little too :) . The build itself was standard for any 4Ground kit until you got to the interior panels on the first and second floors. This was a real head scratcher for me. Never before did something feel like nothing but busy work - gluing each individual panel into each wall was just brutal.  And honestly, not very "Old West" in feel in my opinion. If they were white and not brown, they would easily fit into a Sci-Fi setting, whether it be corridors in a base or spaceship. The thing I absolutely love about the 4Ground stuff is you can literally get a building on the table in almost no time at all. This wasn't going to happen here.


Anyway, with all that being said, I'm still really happy on how the build ended up! You'll notice a few changes right away. First is that I ended up changing the color on all the window and door frames, as well as the trim along the roof. I went with German Gray from the Plastic Soldier Sprays uniform line. I also changed the sign. This is probably my favorite part of the building. I messed about with two different fonts and sizes on the computer  - something I will definitely be doing going forward for any other signs I need to make - to get the custom Fords Canyon First National Bank sign. I weathered the sign with some Vallejo pigments and I couldn't be happier with the results! The sign on right side of the building came from what was supposed to be on the overhang in front. And that's the last change, I eliminated the front overhang completely. My initial plan was to make the overhang wrap around the right side, all the way to the back, and put my customary posts on. I even had some scrap wood already set aside for the job. It was when I began, well was actually finished with prepping the front overhang, that I was doing some test fitting when I realized that this overhang wasn't like the Undertakers and it didn't go all the way to the end of the porch!?  It only went about halfway.  If I stuck with my original plan, the posts would be right in the middle of the walkway. So the overhang had to go away. But what do I replace it with. I messed about with a few ideas, all which were awful, until I decided I would just try to fill the holes in with some kind of filler.


I ended up using some base compound to fill the holes in - the two above pictures. It ended up filling in everything with no problems. A small file sanded the little blobs down nice and even. The problem ended up being that I couldn't get a good enough match on the paint (which was a bit frustrating because I have the 4Ground paint to match) and where the holes were. The wood planks should have gone all the way through where the holes were.  So there should have been a line there indicating the wood plank continuing across, if that makes sense. I tried to carve out the lines, but that ended up being a train wreck and  I ended up re-filling a few of the holes again. So, what comes to the rescue? My ever present lamp posts. I cut four lamps and placed them right on top of those holes. I used some scrap wood to make the small white signs on the front. I cut "Banking Securities" and "Deposits Loans" from the acetate that was supposed to be used for the front windows and glued them on the wood and placed them over the last two holes I had to cover. The final solution ended up being easy enough, and I'm pretty happy with the new look!


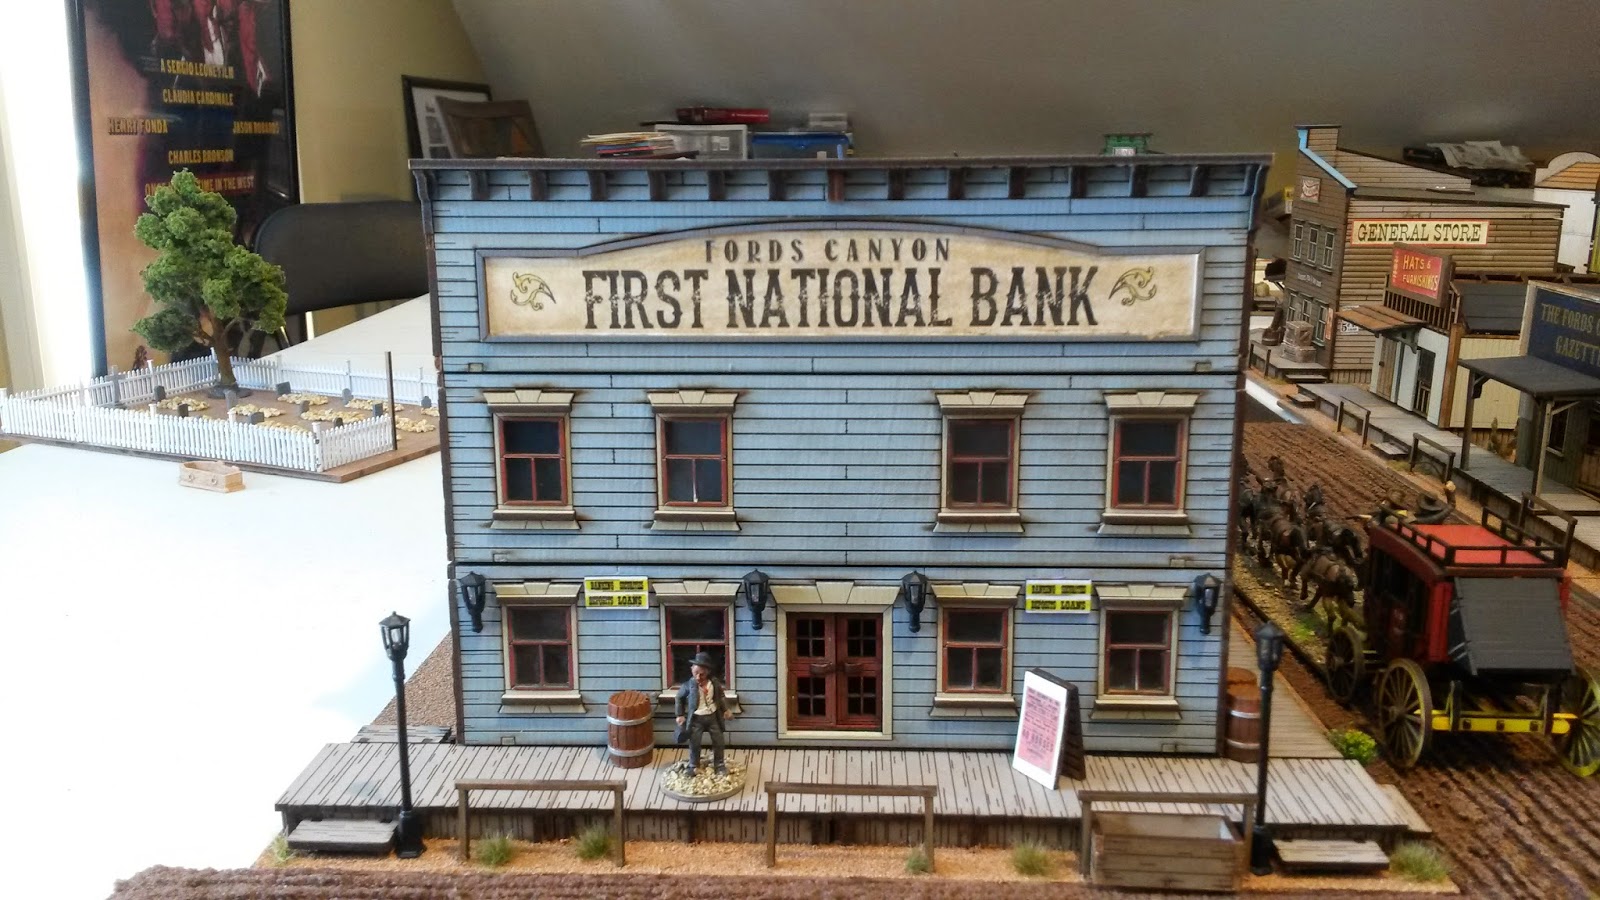
Getting back to the interior of the building, I don't know what I did to make a meal out of the counter, but I did something wrong to where my posts wouldn't line up to fit in their holes and I ended up having to cut them down to fit. Again, I'm at a loss to exactly where I went wrong here as the counter itself sat flush both against the floor and walls. Trimming, filing and the occasional "What the #%$@*)!" finally got the counter completed, though not how it was supposed to have been. I call user error on this one, but again exactly where the error occurred is beyond me. I've seen some other guys builds and it looked as though they had no issues at all here. The final picture shows some touch up on the bricks, which improves the look.

 The gigantic base, with horse hitches, Army Painter tufts and some JTT Scenery flower

Again, certainly not my favorite kit to build, but I'm pretty happy with the final results. Though I wish I was able to make a fifth window on the second floor, I made an attempt which didn't work out, that I wanted to go above the door. Too much space between the second and third windows on that second floor.

I learned a lot on this one, but I think ultimately the most important thing was that there is always an answer. It may not be there straight away - hopefully it's not six months away again! - but it is there, and I've just got to find it.


Here are a few of my Artizan bank robbers in action!


 Next up is that trollop called the Sassy Gal. For months I've been lamenting about the size of that kit in relation to all the other 4Ground buildings on my table.  I'm hoping that I'm wrong, because I've already got a name change and new owner set for it! I don't want it to not make it on to the table.

As always, thanks for looking!


Saturday, February 21, 2015

4Ground Stairs - A Simple Upgrade


Something very easy I stumbled upon a few weeks ago while working on the Sheriff's Office was this simple upgrade to the 4Ground stairs.


I finally had a chance to complete this little project earlier in the week as I'm waiting for some items to arrive in the mail for completing the 4Ground Bank kit.


There was always something a little off in my eye with the stairs not having any railings and I'm absolutely positive this decision was made strictly with game play in mind.


But I'm here to tell you, this upgrade does not prevent figures from being placed on the stairs at all!


The best part is if you have built any 4Ground kits you probably have all the materials sitting in a box (well, if you're like me and can't throw anything out that is), so it costs you nothing! This is all you need to complete one set of stairs - two ladders, two of the "Z" door attachments, and one (even though my picture shows two) piece of scrap wood for the long part of the hand railing. I use Gorilla Super Glue for all my builds (that way I don't have to wait for things to dry), an Xacto knife, and a small file are all the tools you need.


For the longer front side railing (above) on the landing I just use an Xacto knife to cut 8 rungs over to the right on the ladder. That leaves the right side of the rail with a straight edge - don't cut the left side though! Glue to the landing. I cut the middle part of the first "Z" out to make the first post at the bottom of the stair. The middle part of the second "Z" is used for the middle post - what's great about these pieces is that the angle of the "Z" where you've made your cut is the exact angle you need to match it up to the hand rail! Just cut the bottom straight and glue. The long part of the hand rail does take a little trimming and sanding to get your angle to sit as flush as possible to the top rail, middle and bottom post, but honestly it's minimal, and if I can do it anybody can!


Use your second ladder to make the back rail of the landing. Cut 5 rungs over and make your cut straight - again, don't cut the left side though - and glue to the landing. The straight edge here really matches up nicely to the front rail where you left those two little edges! That's it, simple!


Here's some pictures of all my stairs completed. All that is left to do is paint them with 4Grounds #8 paint, Burned Wood, to get a match!


 Here are some pictures of the completed painted stairs.


The only thing that is bothering me a bit, and I'd love some feedback on it, is should I paint the sides of the stairs? I went ahead and painted one set (below on the left), but I painted the inside that sits against the building so if the decision is not to paint the whole thing, no one will ever see this test piece :) !


As always, thanks for looking!
Ivor

Saturday, February 14, 2015

A New Undertaker


A good friend of mine (from the original Saturday mornings back in the day) and my son got a few games of Dead Man's Hand in a few weeks ago. A good time was had by all, and I only really messed up one rule - which for me is pretty amazing. I buy rules sets to play them wrong and make mistakes throughout an entire game! Anyway, after the last game it became quite clear that an undertaker was going to be needed in Ford's Canyon sooner than later (an older post tells how I changed the original C.F. Caldwells undertaker building into a saloon). The carnage that was left made the end of Sam Peckinpah's "The Wild Bunch" look like a walk in the park!


This new undertaker business was again born first through the sign I found. The sign is very simple, but the way "Undertaker's Parlor" was written almost felt like a frown to me, and the name John Benson Gollon was pretty neat. Like C.F. Caldwells, most undertakers were doing some other type of carpentry/furniture making, so I knew I wanted to make this build something more than just a side street building. I needed to make it bigger somehow.


The main building is 4Grounds side street building #3. I grabbed a few of the exact same buildings because this allowed me not to have to make posts for the porches. Their posts have nice little details on them that my Balsa wood posts don't and the only real differences between the three side buildings is the roof sign and window placements. I painted the front wall with Plastic Soldier Army Sprays "British Armour".


I have a ton (and even more to build still!) of 4Grounds excellent 28mm Historical range of buildings. I had the Woodshed/Cart Shed from their Age of Black Powder range (pictured above) already built and I knew with the wood siding I could work this into the new undertakers, I just needed to decide if I wanted it vertical or horizontal to the main building. I found a really neat "Furniture & Undertaking" sign that fit perfectly onto the back of the shed, which made the decision of placement very easy.


The basic footprint of the building is bigger than any of my other builds because I knew I wanted to add the extra shed and I also knew I wanted to get the Yard Panel Fencing by 4Ground in there as well. I set the glued sub base and boardwalks down and weathered them with Age It Easy by Micro Mark.


I had already built the fences, so I had to pull the bases off and I drilled small holes into the footprint to secure the fence better. The fences were also weathered with Age It Easy and also a new product I found called Dark Mud by AK Interactive, was placed along the bottom of the fence. It's an enamel and you just paint it on - I used a Q-tip to soften the transition, and honestly I'm pretty happy with it, though my awful camera phone doesn't do it justice.


I added my customary lamp posts and horse hitches to the front as well.


I added a lot of posters to the side fences. They are all from old 4Ground kits.


One small tip I can give on signs and posters is before you place them, take a black Sharpie and go around the four edges with the marker. This simple addition will improve the look of your signs and posters on your buildings, I guarantee it!


The same styrene strips, Evergreen #142, from all my other builds were used here as well for the roof and porch overhang. The coffins are made of hydrocal - I got them a long time ago and can't remember from what company. I got a ton of them, and boxes as well, pretty cheap. Though they definitely need repainted.


There is one wooden barrel next to the building made by Hirst Arts. These are new to the table and these things are fantastic, and inexpensive! Took paint really well - I decided not to prime them in hopes to get a little more weathered look (they come white) by painting my initial coat of wood brown very thin. I couldn't be happier! I've got close to 40 on the table now. A silver Sharpie is all I used for the bands.


Army Painter tufts were placed randomly around the building and two yellow JTT flowers were place out front. The basic flock is Woodland Scenics Ballast Fine Brown, and dry brushed with a light gray to bring it out a little bit more.

                                     
That's pretty much it, as always thanks for looking!

Cheers!
Ivor                            

Thursday, February 5, 2015

DMH Main Street Two Story Buildings & Another Saloon


This update shows a couple of two story buildings and a name change to C.F. Caldwells Undertaker and Furniture Maker. These three are pretty basic and simple upgrades, so there really isn't a whole lot to talk about.


First up is Rowdy Kate's Sweet Magnolia Dance Hall. I really struggle with finding the right "business" to fit into the two story buildings. Does this size of a building really hold a dance hall? Probably not. Am I thinking way too much into it. Absolutely. Anyway, here was another sign that when I saw it, I knew it had to get onto a building.


As with the other two story buildings, I wish I'd have painted a wall or two so the yellow wouldn't stand out so much. Another roof upgrade was done here as well. 4Ground Bleached Wood Axed Shingles did the job well - and I completed the peak shingles correctly as well! No wash or anything was applied to the shingles.


I bought one of 4Grounds piano kits and it fits perfectly with this particular establishment! Really neat little kit that went together easily and certainly looks the part. I added some bunting onto the second floor balcony to try to draw attention away from all the yellow. And another clock has made its way into Fords Canyon - that 3:10 to Yuma is almost here!


The Land Surveyor, with Victor Ario's Saddlery & Harness Trunks & Luggage occupying the second floor, is 4Grounds main street building #2 repainted with Army Painters Matt White. I did leave the window and door frames red. I can't tell you how well that the 4Ground woods take to spray paints. I'm here to tell you, don't be afraid to change up some colors on your buildings.

It's super easy and more importantly your buildings won't look exactly like everyone else's. The key is you have to do your painting before you actually start the build! Paint everything right on the sprues.  


If I could go back, I would definitely change the colors of a few of the first buildings I purchased - though I dare not try to change the color of a building already completed, too much taping off of the window frames and door frames would make it too difficult.


More Balsa wood posts were added to the front porch. This building has 4Ground's New Wood Shingles with a real light wash applied.  
                         

The Red Dog Saloon replaced C.F. Caldwells Undertaker and Furniture business. When the Undertakers was first announced I was pretty excited because it was a corner building. As I mentioned in an earlier post, there is just something about the corner buildings I really love the look of.


I always thought that this building was way too big and way too nice for an Undertaker - I have some ideas for a new Undertaker business so he'll definitely be represented in Ford's Canyon, but a big building like that, it has to be a saloon. So was established The Red Dog Saloon. I found some really neat signs that I sized to fit into the Undertakers frames. Again, I added bunting all the way around the front porch.

More Balsa wood posts were added around the porch. I had started to paint the window and door frames red on the back wall of the building, and the plan was to continue all the way around the entire building in an attempt to change the original colors of the building. I quickly found that that was going to be an incredibly time consuming task. Time I felt could be better spent on a hundred other "to do's" I have waiting! Maybe someday I'll come back to that. Styrene was added and painted to both the porch overhang and the roof to improve the look. Lamp posts and horse hitches are placed around the front. I have since made "Rooms For Rent" sign on the back of the building much bigger.


The two figures out front are from Blue Moon. Part of their 28mm Tombstone Civilians set. They've got some really neat figures in there - lots more I need to still paint - but I definitely recommend them. The same with the rest of their 28mm Wild West line. I have them all, as I grabbed them at Historicon a few years ago when I had the Old Glory Army card, and couldn't be happier with them - those I actually have all painted and based anyway. I'm sure I'll do a future post focusing on all my figures.


As Always, thanks for looking!
Ivor