Saturday, October 15, 2016

Ghostbusters Updates and WIPs


Though not a lot of updates on the blog, lots of pieces and parts coming in for the Ghostbusters game and also lots of WIPs getting finished for other games as well, so very pleased with the current progress.


Finally got through making plates for almost all my trees. I still need to complete maybe 5 or 6 more plates and that will actually clear every tree I have built currently (I still have two boxes of Woodland Scenics trees that do need built, but those may end up going into the 'ebay sell' pile).


I used the pieces of MDF from my failed attempt at modular streets for my Dead Man's Hand game I tried a few years ago to make the tree plates. It's 1/8" thick MDF that I cut into both circular and kidney shaped pieces, then I cut and sanded down the edges to give them a softer edge. Not having the hard edge makes the transition much more visually appealing in my opinion. 


I cut the bases of some of the trees a little and then just super glued them down. I had thought about doing magnets again, like I did with The Chicago Way board, but ultimately decided to go with the quicker option just to get them on the table.


Since the MDF was already brown in color I didn't even bother putting down an undercoat of brown to simulate dirt. PVA brushed on the MDF and then flock applied, completed all the plates in less than an hour.


Above and below are some of the completed trees (but realized when taking the pictures I forgot to paint the bottom trunks, oops). I now have 15 tree plates to use for games and I couldn't be happier about not having to set up individual trees anymore!


I also finally completed a couple of resin hills I've had for close to a year.


These are really nice solid resin pieces that I grabbed super cheap off of Ebay. No bubbles in the cast at all, a quick spray with some primer and they were ready to go.


I went through with some cheap tan acrylic paint and painted the areas of rock.


And then went with a brown acrylic paint where I was going to have grass. Then it was PVA and flock over those spots.


I used Citadel Nuln Oil for my wash of the rocks. Dollar wise, probably not the best choice for a project this large, as with all Citadel products it's pretty expensive, but I felt the end result was definitely worth it.


I also primed and started to paint some pulp objective markers I picked up close to a year ago as well. I thought these could work well for Pulp Alley, but perhaps they could work for 7TV too. They are from Spartan Games, and the castings are absolutely fantastic! They are made from resin, with no bubbles and absolutely zero clean up needed.


The only thing I don't care for is the bases they are on. The base is actually a part of the mold, so there really isn't a way to separate the objective from it unless you went Dremel crazy. A bit disappointing because I feel it makes them look a bit too big, though I do think they are originally made for a 32mm game.


The detail on each individual objective marker is amazing. Hopefully I can get them painted up to the standard they deserve. Stay tuned.


I also got my gates together for the Manor table. Unfortunately I don't see any way to get the gates to actually open and close. Damn 4Ground has completely spoiled me with opening and closing doors!


The ghosts, spooks, and spectres have slowly been starting to arrive to tangle with our ghost busting heroes. Lots of Reaper Bones figures, along with some D&D miniatures as well.


The Reaper figures look fantastic right out of the package! Maybe a light dry brush to bring out some highlights, but they look pretty much ready go now as you can see from the first photos up top.
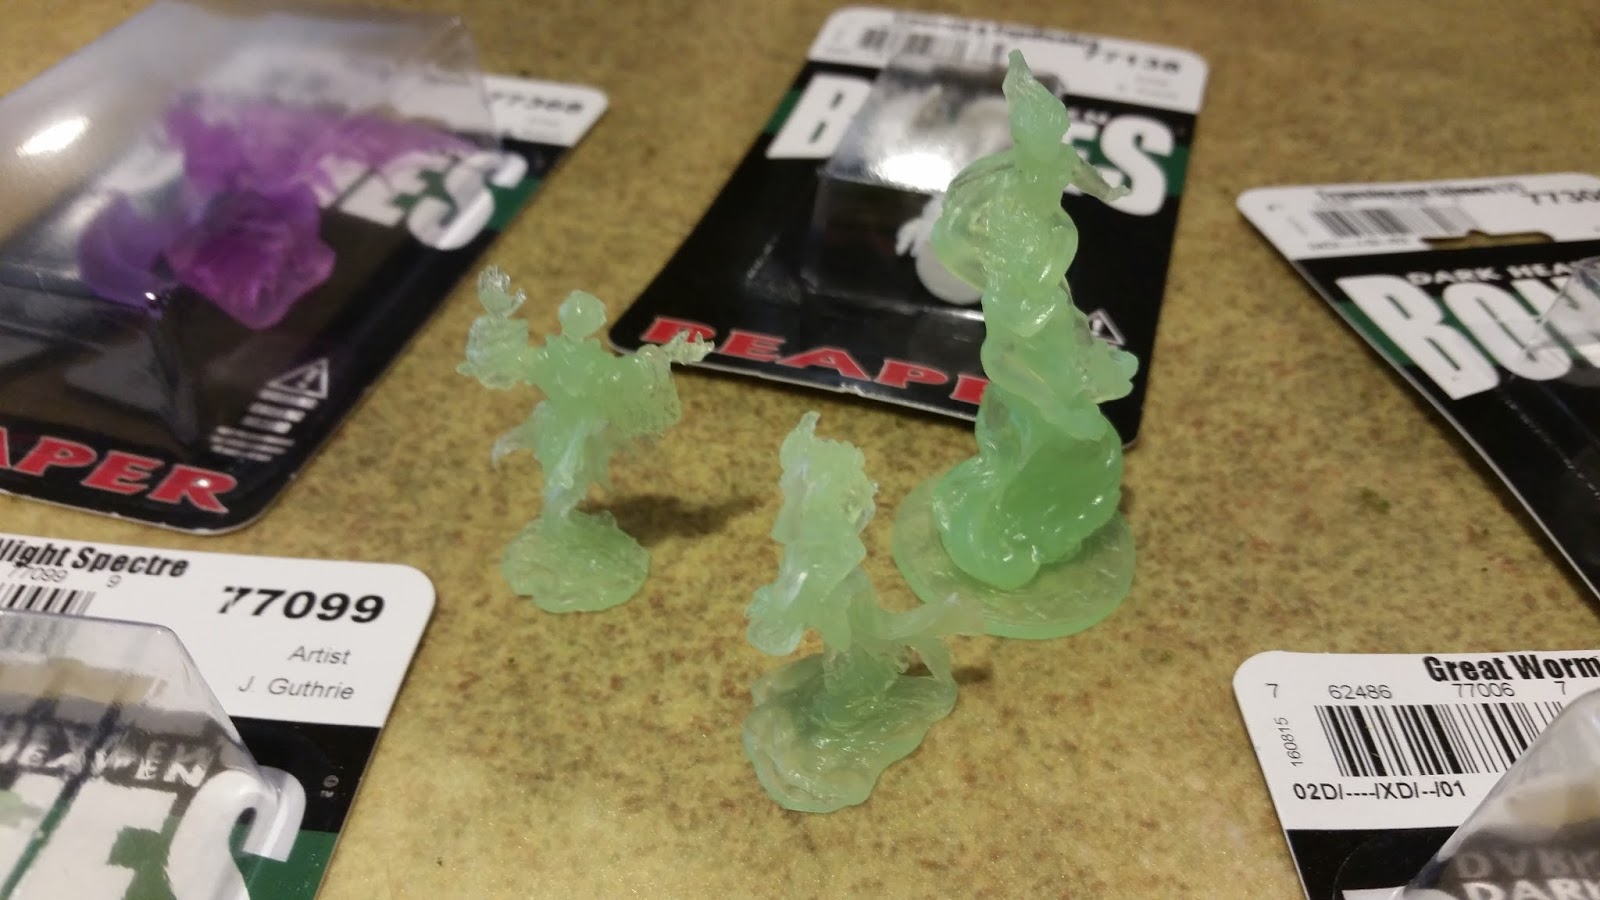


The D&D figures aren't nearly as good as the Reaper stuff, but I think they can add a bit of variety, especially when I get them rebased. Really like the bat swarms :)


And finally, trying to clean up and paint some neat little scenery pieces for more of a spy-fi pulp like game. Again, another Ebay purchase, which have some really fun lab equipment or super villain lair pieces. Computers, lockers, terminals, filing cabinets, there is even a copy machine! Unfortunately these do have quite a lot of bubbles in the castings that need filled.


A quick final photo of the table set up with The Chicago Way figures for a Little Bohemia scenario shootout I had.


More updates coming soon!

As always, thanks for looking!
Ivor

Wednesday, October 12, 2016

Jonny Quest's Roger "Race" Bannon

Jonny Quest. The original 1964 version was greatest animated television show ever. I'll argue that one all day long!


This is another project I've been thinking about and buying figures for the last several years. Nothing says adventure more than the Quest gang! These guys were traveling all over the world, fighting evil scientists, legendary monsters, rogue generals, pirates, Nazi's, madmen, experiments gone bad, dinosaurs, native warriors, master criminals. Searching for lost treasure, missing scientists, chasing a robots spy, etc. etc. etc. Not to mention all the neat gadgets they used throughout the 26 episode series. It's like James Bond (with a heavy emphasis on Q Branch) and Indiana Jones all wrapped up into one brilliant package. This cartoon had it all, and it stills holds up today!


Well, today I finished Roger "Race" Bannon - special agent, bodyguard, and pilot. Race works for Intelligence One and is charged with protecting both Dr. Benton Quest and son Jonny, as well as adopted their son Hadji. Race was definitely the muscle of the group, and easily the figure I wanted to do first.


I really struggled, and honestly searched for a very long time, trying to find a proxy to represent Race. I even questioned on many occasions why no one has ever done the Quest gang. As I mentioned earlier, I think the Jonny Quest cartoon was hands down the best cartoon ever done. How is it possible no one has never done these guys before?!


Race really didn't wear a lot of different outfits throughout the series; a winter one, a karate one, and swim trunks, off the top of my head. So it was pretty easy to decide that the classic red shirt, gray pants outfit was going to be what I wanted, though I do think a winter version of Race would be pretty neat. I also really wanted a figure holding an automatic rifle, something similar to the very first picture above, but just had no luck at all. It was when I found Hasslefree's post-apocalypse Barney figure that I finally felt I had something that represented what Race was all about - action first!


This figure is supposed to be an alt universe version to their regular Barney figure, who is based off of Fred Jones of Scooby Doo fame. This figure did need modification for what I wanted though. He originally had a katana strapped to his back, as well as a pouch/bag on his left hip. I used an Xacto knife to cut both pieces off, and then sanded everything down.


I'm not very experienced with green stuff, so unfortunately his back isn't as smooth as I'd like, but I'm sure not very noticeable except to me :) Gray primer was applied to get him ready for paint.


As usual, I started with painting the skin first, then went to Race's distinct white hair.


I had quite a difficult time finding the right shade of red, which was extremely frustrating! I tried four different colors of red, until finally deciding on one, and I'm not even 100% happy with that. It's hard to find that balance between being bright enough, but not glossy. Below is one of the first reds I tried and ended up painting over because it was too dull.


As with all my Chicago Way figures, going forward I have decided on clear bases for all my pulp figures. The Hasslefree figures are super easy to cut at their feet to get them onto the bases. Pins were drilled into his feet that then went into the base, that way no glue is required. No need to worry about the 'frosting' that happens when super glue touches the clear base.

Super pleased with how Race turned out and looking forward to completing more Quest figures, including the plethora of bad guys. The main focus will be continuing on the Ghostbusters project, but I feel that having Jonny Quest as a side project will really help if I get stuck, need a break or creatively get off the track with the boys in gray :)

As always, thanks for looking!
Ivor


Tuesday, September 27, 2016

The Next Big Project

Once you run a successful game at Historicon it quickly becomes 'how can I make next year even better?'. Does it mean a bigger table, more figures, more players?


I've been thinking a lot about Historicon '17 and what I'd like to do. I had two ideas that I felt could be both a visually and fun game. I've decided to shelf the one idea as I'm not sure on a rules set that would work, but will make sure that I continue to search for one because it can end up being something amazing!


So, Historicon 2017 I have decided to run a Ghostbusters game using the 7TV rules from Crooked Dice Studios. There is a part of me that is a bit apprehensive about it because there's still a large percentage of HMGS members that believe historical, and only historical, games should be at the conventions. And I absolutely get that. First and foremost I am and will always be a historical gamer, but in a broader sense I just a gamer. And more importantly one that wants to just have fun playing a fast, easy to learn game on a great looking table. We'll get more into the specifics of the game, story/scenario, rules, figures, and ghosts and monsters in a future post, so for now I'll focus on the board WIP.


What is really great about this build is that it has turned out to be a table that can be used for multiple game systems - The Chicago Way (think a Little Bohemia scenario), Pulp Alley (I'm thinking Scooby Doo, though 7TV could probably cover that as well), a spy-fi James Bond type 7TV game (the complex will be the villain's chateau, with a whole underground level, yet to be built, but of course I've already been researching company's that can help make that happen- Sally 4th!), and also Bolt Action (as any one of a multitude of scenarios). So that's definitely pretty exciting!


All four buildings are part of 4Grounds Hotel Complex from their World at War range. It consists of the Stone Hotel, Grand Stone Hotel, Stone Coaching Stable, and Cook House. I also added the Mordanburg Well from the Fable Realms line as I thought it looked the part. Unfortunately I lost all my WIP photos of the actual build when my phone broke last month, so that's pretty disappointing. I only managed to save the two below. Overall though everything went together easily - the two main hotels did take a few days each to complete, and in hindsight I wish I had done some sort of tile or carpeting in the rooms during the build, and not after, which is what I have to do now. It's going to be much harder to cut things out with all the walls glued in.


I added shutters to all the windows and I think it makes a huge difference. They are from Grandt Line who make model railroad add-ons in On30 scale.


One of the big things I also changed was the size of the courtyard. 4Ground make a courtyard specifically for this complex, and of course I own it, but I always felt it was too small. This is a photo of Jay White's excellent hotel complex using that 4Ground courtyard. See more of his outstanding work on the complex here http://jayswargamingmadness.blogspot.com/2014/03/ww2-west-front-town-project-update-4.html


The kind of setup and games that I had in mind was going to need a good sized courtyard. So I played around with some different layouts, but decided to just simply move the coaching stable back about twenty inches from the hotel and cut the MDF. I also decided to make my cuts so the buildings would sit up against the MDF, like the original 4Ground courtyard, as opposed to sit on it.


As usual with any MDF I try to use glue on, I got warping. Gluing on the cobblestone courtyard caused some terrible warping near the edge where the coaching stable is and on top of that the PVA didn't even work as the mat pulled right off! Extremely frustrating honestly. I ended up using super glue around the edges but do have some "bubbles", which you can see below, in the center where there is no glue. I'm still working out how to clear the bubbles and getting it back level near the coaching stable.


The mat is from a company called Lemax, who make diorama items for Halloween and Christmas. I picked the mat up at Michael's craft store in the Christmas section for about $12.00 after I used a 50% off coupon. Pretty much a steal for a mat that is 36"x18".  I can't recommend these mats enough, even without a discount, and will be sure to grab a few more over the coming months.


As you can see it scales up pretty good to 28mm. I did apply a light dry brush to the mat but it doesn't show up too well in this photo, some of the others it does though.


I also picked up some Lemax iron fences in the Halloween section. After a coupon and the fences already being on sale it worked out to less than $3.00 a pack! I needed 4 packs to go around the entire perimeter of the complex; which also gave me a main gate (I used two single gates together to create the double main gate - to the left of the coaching stable) and then one single gate by the cook house and also by the side of the hotel. All the fences still need some highlighting to give the appearance of oxidation. I also clipped off the small black 'foot' (photo below) on each piece and then super glued them into their posts to make single runs of fencing that go the entire length of the edge they are on.


I built the 4Ground Mordanburg Well and placed that in the corner for some more eye candy. But this also could be a neat secret passage that could go to the hotel basement ala Scooby Doo.


Brown paint was put on where I wanted grass to be.


And then the flock was applied.


I also grabbed these Lemax coffins super cheap as well. I had to sand off the "RIP", but again they scale up pretty good to 28mm.


Still lots more to do. I have a ton of shingles ordered for all 4 buildings, including the well. Interior floors and possibly wallpaper to do. I'd also like to do a little more around the outside of buildings; paint touch-up, some ivy on the walls, perhaps a tree or some bushes, a telephone pole, extending walkways, and probably some signs. Stay tuned!

As always, thanks for looking!
Ivor

Thursday, September 1, 2016

Feldherr Foam Cases


One thing that became abundantly clear at Historicon was that I needed a better way to transport my figures. I had been using plastic storage containers, lined with magnetic sheets - all of my figures (except for the new Pulp era ones based on the clear plastic Litko bases anyway) have washer bases that work well with magnets - the problem was the sheets were never powerful enough to keep the figures stable, so when the container moved, so did every figure.


After setting up the test run of TCW on Wednesday and seeing all my figures toppled over, I made my decision to buy one of the foam carrying cases I've seen every year at Historicon on Thursday morning when the vendor hall opened. And you know what, for the first time, no foam carrying case vendor!!??


Maybe it's better that that turned out that way because when I got home I started to search for foam cases and I stumbled upon Feldherr Cases. These cases are made in Germany so I knew right off the bat that they would be a high quality item. I continued to research them some more and found a YouTube video with a review of them. I was sold after that, so I decided to look at Ebay first - low and behold I struck gold and found a 180 figure carrying case for just $63.00 with free shipping!! It arrived in no time at all (and easily had to cost the guy $20.00 or more to ship it because it is pretty big), and I immediately started to put figures into it. It came with 5 separate trays, each holding 36 standard size figures.


It has a shoulder strap, as well as a side pocket that you could fit a rules book or army book into. Nothing very big though, and definitely can't see more than two books fitting - depending on whether or not they were hardback too.


The bottom has these plastic feet attached to keep the case directly off the ground too, which is a nice addition.


I continued to look on Ebay every couple of days, but I knew I wasn't going to find a steal like that again, so I decided to look around Amazon and see if anything came up there. Sure enough, the cases were there as well! They had the identical case I'd found on Ebay for only $6.00 more than what I paid, but then I saw that they had 180 figure boxes - 4 foam trays inside a cardboard shell - for only $36.00. I knew I'd really only need 1 true "carrying case", as I'd never be bringing more than 180 single figures to a skirmish game (I'll keep the plastic containers for the ACW and AWI figures based at 2 or 4 per stand). At $36.00 I decided to get two. That means I now have the ability to store 540 individually based figures between the three - now the question is will that cover all my figures (Pulp, Bolt Action, Old West, Batman, LOTR, Pirates, and etc. etc. etc. that I'm forgetting) ? Well, at first I felt pretty confident it would - but after filling up two cases rather quickly, now not so much! Looks like I'll need to grab some more boxes :)


The box case foam holds 45 figures per tray.  I see no issues if I need to swap trays out to the carrying case if needed. It also comes with a handle you assemble into the top of the cardboard box, for easier transport.


Final verdict - super happy I now have foam cases to protect my figures and couldn't be more pleased with both the quality and cost of the Feldherr Cases. Highly recommended!

As always,
Thanks for looking!

Ivor

*but...and there always has to be a but - because I'm OCD I now have to paint the bottoms of the washers on all the figures!!!! Now do I paint them black or brown...grrrrrrrrrrr*